
SPRINGFIELD ARMORY XDS GEN 1 PRE-RECALL DETAIL DISASSEMBLY PT 6 OF 6 SEAR & TRIGGER
Compatibility: Springfield Armory XDS Gen 1 - Pre-Recall
Step 6 Sear Housing and Trigger Disassembly
This is part 6 of a 6 part article series focusing on the complete 100% detail disassembly of the Springfield Armory XDS pistol. If you can not easily find the other sections use our search icon on the top right of the website. Type in "XDS Detail Disassembly" and we will provide you with the complete series.
We have broken the six part series into the following sections to make it easier to follow and focus on the following areas.
Sections:
6. Sear Housing and Trigger Disassembly
Notes:
Springfield Armory does not recommend further disassembly of the frame. "Further dismantling is not necessary and should only be done by Springfield, Inc. or a qualified pistolsmith". Pg 26 XDS operation and safety manual.
These instructions are for informational use only and should only be attempted by trained individuals. If you are unsure and/or do not have the right tools and training please do not attempt.
The following steps are for the complete 100% disassembly of the Springfield Armory XDS pistol. The disassembly procedure will be spit into 6 parts focusing on the different assemblies and areas of the pistol.
Here we have the internals for the Springfield Armory XDS, this will include the trigger, Trigger bar and rear sear housing assembly. All three pieces are connected as one assembly when we remove or re-install them in the frame.


The first step in disassembling the internals assembly, is to grip the rear sear housing like picture one (far left). Next what we are going to do is with your other hand grip the Trigger Bar about half way in-between the sear housing and trigger. Next (middle picture red arrows) slightly pull the trigger bar forward, noticing how it fits into the sear. While gently pulling forward also pull the trigger bar out and away from the sear housing. The trigger bar is now disconnected and you are left with two separate assemblies.


Moving on the sear housing assembly, orient the housing so you are looking at the back end where the grip safety is pointed directly at you like picture one (far left side). Notice how the sear spring has an end hook that is wrapped around the grip safety pin (horizontal pin exposed in the U shape on top of the grip safety). The spring end is riding in a retainer groove machined in the grip safety pin. We need to take a pick or small flat head screw driver and push the spring out of the retainer grove to the right side of the groove. Next use a small punch to push the grip safety pin out from right to left. The grip safety can be removed as shown in right picture.


With the grip safety gone, we can now pull the sear and sear spring out of the housing. Please make a not of how the sear spring attaches to the sear and which way the hook points up to catch the grip safety pin. The Spring ends are in the same orientation as the letter S when everything is assembled.


Next we have to remove the grip safety spring. Notice that in the left picture the most bottom hole in the sear housing is empty. This is the hole for the roll pin used to hold the sear housing inside of the frame and is supposed to be empty at this stage (no you did not loose something). Push the grip safety spring pin (red arrow) either direction to remove the pin and angled torsion spring.


To remove the disconnect, orient the sear housing so you are looking at the back end like picture one (left side). Take a screw driver or flap piece of metal and use it to slightly push the disconnect spring to the left. You will notice that the disconnect pin gets exposed on the left side. While pushing the spring left pull the exposed pin out of the housing. BE CAREFUL! the disconnect spring can go flying! Slowly push the disconnect spring out of the housing, noting that the end fits over the silver looking disconnect to hold it in place.


With the disconnect spring out of the way, we now have room to push the disconnect into the housing first picture red arrow. To reassemble you will need to reverse and go from inside the housing pushing out. You will not be able to reassemble from the outdoes of the housing.
Remember that this is for a pre recall XDS Gen 1 pistol, but here is your parts list (top row, middle row bottom row).
Sear Housing
Disconnect Pin
Disconnect Spring
Disconnect
Sear & Sear Spring
Grip Safety Pin
Grip Safety
Grip Safety Spring Pin
Grip Safety Spring
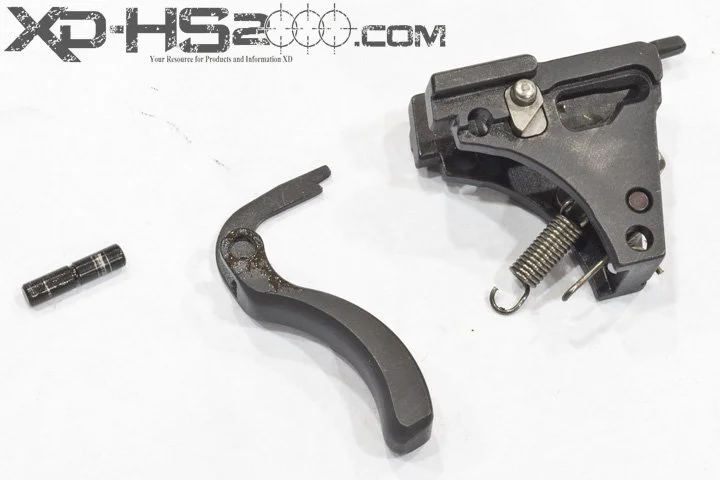
To disassemble our trigger assembly, we need to tap out the top roll pin (red arrow) to remove the trigger bar.


The trigger bar pivot pin can be removed in either direction, leaving you with three pieces.
Trigger Bar
Trigger Bar Pivot Pin
Trigger Shoe Assembly


The trigger shoe assembly can be disassembled by removing the trigger safety pin in either direction as shown in picture one. Use caution as the trigger safety blade is under spring pressure and the spring can be lost. Once the pin is removes slide the safety blade from the back of the trigger shoe exposing the safety spring. You now have four pieces of the Trigger shoe assembly
Trigger
Trigger Safety Blade
Trigger Safety Blade Spring
Trigger Safety Blade Pivot Pin
Congratulations, if you followed all six steps, you have 100% fully detail disassembled your Springfield Armory XDS Gen 1 Pre-Recall pistol.